I am thinking of buying a one-shot-camera and I am extremely excited about this new CMOS camera.
QHY268C TEST REPORT
The
QHY268C is the latest APS-C sensor camera from QHYCCD, featuring the color-only IMX571 back-illuminated CMOS sensor. It features a native 16-bit ADC and a 3.76um pixel size for 26 megapixels total with zero amp glow. The camera produces very low dark current (0.0005e/pixel/sec @ -20C and 0.001e/pixel/sec @ -10C) and read noise (0.7e- to 5.5e- depending on mode and gain choice). It also features an extremely high full well capacity up to 75ke-. The quantum efficiency of the sensor is not confirmed but tests suppose it is close to 90%. This combination of high fullwell, high QE%, and native 16-bit ADC allows for an unparalleled dynamic range response not available in other CMOS sensors offered currently in this price range. These features set it apart from the current pack of 12 and 14-bit one-shot color cameras available in today’s dedicated astronomy camera market.

GENERAL FEATURES AND PHYSICAL DIMENSIONS
The version of QHY268C I have received is the early bird version of the camera. Like the early bird version of the QHY600, the larger full frame companion to this camera’s sensor, it features a longer body (approx. 180mm) and scientific features. It contains the infrastructure to use two 10 Gigabit fiber ports for up to 20Gbs file transfer. This feature is currently disabled and will require a PCIe capture card, an addon that QHY will make available later. If one chooses to enable this feature later (which will most likely be quite costly) file transfer speeds can reach up to 2000MB/s, compared to the typical USB 3.0 speed of 300MB/s.
It is slightly heavier than most of the QHYCCD medium size format cameras at 990g (1065g with tilt/centering adjuster). For comparison, my QHY367C weighed in at 770g. A standard photographic version will be available from QHY and not be quite as long as the early bird version, but will still be a bit longer than other current offerings. Most of the weight is up near the sensor half however and I don’t think it should present any tilt problems on good focusers. However, it is something to keep in mind.
INCLUDED ACCESSORIES
Included accessories with the QHY268C
Aside from the camera, the box contains the following items:
• 2″ nosepiece to M54-M adapter
• Desiccant tube
• 6-hole 0.5-13.5mm spacer kit for adjusting fine backfocus
• Cigarette lighter power adapter
• 12V power brick
• Locking power cable
• 5 ft USB 3.0 cable
• Centering/tilt adjustment ring
• M54 screw on metal camera cap

I was happy to see that they are now including a spacer kit with their cameras; backfocus and spacing is a continued frustration in this hobby for a lot of people. The included spacers have six holes that attach directly to the camera body via M3 screws. It’s worth mentioning that depending on how much space you require, you may need to purchase different length M3 screws. If you are using a QHY OAG these spacers can be used easily in conjunction with it, but would require longer M3 screws.
My one complaint about the included accessories is that it’s still not quite ready to go out of the box for most users who require the typical 55mm backfocus for many reducers and correctors. The camera itself has a backfocus of 17.5mm, or 23.5mm when using the centering/tilt adjustment ring. With the included spacer kit, the maximum total available out of the box is only 37mm. The user must still make up 18mm with other spacers, filter slider/wheel, or OAG. One thing I would like to see QHY do in the future is offer a “ready out of the box” solution for the standard 55mm backfocus. However, most users will need a customized solution anyway and the reducer connections vary, so I can understand the case against this.
DRIVER INSTALLATION & USE IN IMAGING SOFTWARE
I’ve heard several people on forums say they have had driver issues with QHY cameras. I want to be clear that this is something I’ve never experienced in the nine different QHY models I’ve used over the past few years. The camera itself was quite easy to get setup and I had it running in a matter of minutes. I am using a Windows 10 64-bit installation on a Surface Pro 4. From the
QHY268C download page on QHY’s website, you’ll need to do the following:
• Download and install the QHY System Driver – unzip and run the executable file.
• Make sure you have the latest ASCOM platform installed (if not, get it from
ascom-standards.org) • Download and install the QHY ASCOM Driver from the same page. This will allow you to connect via ASCOM in imaging software.
If you are going to be connecting through ASCOM, you’re done. You can now connect to the camera in your software application (I used Sequence Generator Pro) and adjust the gain and mode in the settings. Make sure “Remove OverScan Area” is checked or you will end up with black lines on the edges. P.S. I do not recommend using the gain and offset settings shown here!
NEW CAPTURE MODES
One of the most interesting features of the QHY268C is that it has three available capture modes that you can choose from which offer varying performance and trade-offs. The charts which show fullwell capacity, system gain, dynamic range, and read noise in these varying modes are available from
QHY here. A brief overview of the three modes follows:
M42, The Great Orion Nebula – 1.1 hours (66×60″)

#0 PHOTOGRAPHIC MODE
This is the standard “default” capture mode. There is a high/low conversion gain cutoff point between gain 25 and 26 where you will see the read noise drop from about 5.2e- at gain 25 to around 2.5e- at gain 26. The read noise response is quite constant from gain 0 to gain 25, and again from gain 26 to about 60. Due to this, most users will probably want to use either gain 0 or gain 26 and nothing in between, as you would only be losing fullwell capacity and dynamic range in the middle. I mainly image at fast focal ratios of f/2.2 so for me it makes more sense to use gain 0. Users of slower focal ratio telescopes, or in dark skies, will most likely want to use gain 26 to take advantage of the lowered read noise. Increased exposure time is going to be recommended over increasing the gain into the “middle ranges.”
#1 – HIGH GAIN MODE
This mode features a consistently lower read noise throughout its response, with the tradeoff of a slightly lowered fullwell capacity. Like #0 Photographic Mode, there is high/low conversion gain cutoff point. For this mode the cutoff is between gain 55 and gain 56, where the read noise drops from approximately 3e- to 1.5e-. I like this mode the most for narrowband imaging as you can take advantage of the extremely low read noise at gain 56 without having to worry much about fullwell capacity. For most of my standard broadband imaging, I also prefer the lower read noise of gain 0 and still relatively high fullwell of 60ke-. Unless I am shooting a field with very bright stars in it where the higher fullwell capacity of Photographic Mode may be a better choice, this mode is my main choice for imaging with my RASA. This mode also features the best dynamic range at 14.26 stops.
#2 – EXTENDED FULLWELL MODE
The name pretty much says it all for this mode. It offers the most potential fullwell, and a higher fullwell capacity through the entire gain range. It has the most consistent response of all three modes as well. The read noise stays around a constant 5.2e- and it has a smoother drop in both fullwell capacity and dynamic range, with more fullwell available at higher gains. I haven’t done much testing with this and I’m not sure of a case where this would be better than the other two modes.
IC434/Barnard 33 Horsehead Nebula – 2.1 hours (129×60″)
PUTTING IT TO THE TEST
When I first got the camera, the weather was not cooperating so I was limited to shorter integration times during windows of clear sky, which wasn't a big problem for my f/2.2 RASA 11. The following tests were all performed in my Bortle 5 backyard (approximately 19.70 average measured SQM) with an Astronomik L2 UV/IR Cut and Astronomik 12nm H-alpha.
My first target test was the Great Orion Nebula. The main goal of my testing was to see how the dynamic range performed. I also wanted to try out the different modes so captured part of the frames in High Gain mode (30×60” at gain 0) and Photographic Mode (36×60” at gain 0). I really couldn’t discern a huge difference between the two modes at f/2.2 other than the diminished fullwell showing slightly more saturated stars in the High Gain Mode. I combined these frames for a total of 1.1 hours (66×60”) and processed it for the result shown on the previous page. Not bad for just an hour!
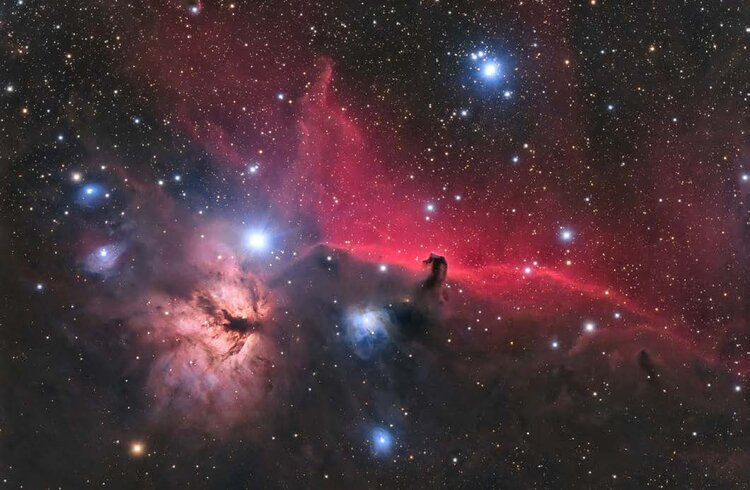
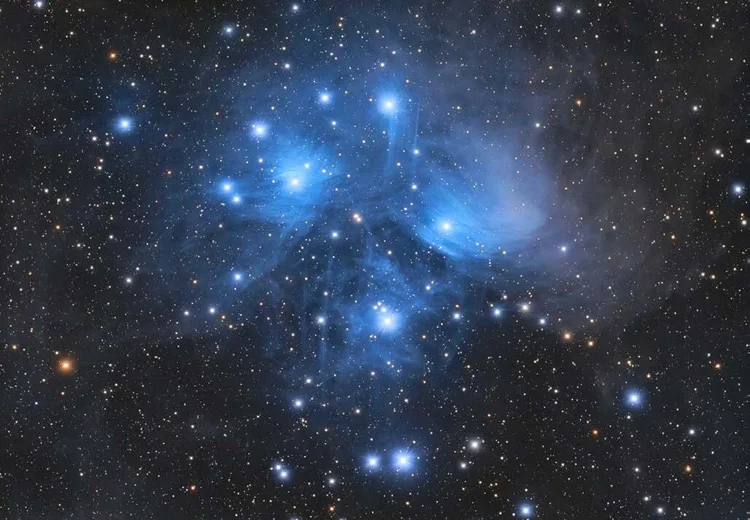
In addition to M42, I also did some testing on the Horsehead Nebula (above). For this I chose to only test with Photographic Mode at Gain 0, Offset 30. The total integration before being stopped by cloud cover was 2.1 hours (129×60″). Several nights later, continuing my trend of not having ideal conditions, a 30% moon was up so another bright object was in order. I chose another popular target, the Pleiades star cluster. I obtained 1.9 hours (115×60”) before clouds rolled in and stopped me in my tracks. The processed result is shown below.
The next step was to try out some narrowband Hydrogen alpha and a fainter target. I’d been eyeing an area in Orion featuring Cederblad 51, with a combination of reflection, emission, and dark nebulae. This perfectly fit the bill.
The moon was 60% illuminated on my next clear night so it seemed the perfect time to capture the Hydrogen alpha. I used the High Gain mode set at gain 56, and managed 3.1 hours (62×180″) through the Astronomik 12nm H-alpha filter. Most people don't think of one-shot color cameras as their first choice for narrowband imaging but the QHY268C can clearly hold its own. Despite all logic of “only using ¼ the pixels,” the resolution is still quite good. A few weeks later I finally managed to get another clear night to add some regular broadband data to this image. I captured 3.6 hours (215×60”). Both results of Ced 51 are shown above.
M45 The Pleiades – 1.9 hours (115×60″)
QHY VS. ZWO COMPARISON
Many wanting to purchase a new one-shot color camera will be debating between this camera and ZWO’s ASI2600MC counterpart so I thought I’d cover some of the differences I’ve noticed. Having not tested the ZWO version personally, these are based off the specs from their website.
1) The QHY has a 2GB DDR3 memory buffer – the ZWO has 256MB DDR3 memory buffer. This may matter for those who want to do EAA or any kind of video capture.
2) The QHY has 3 different readout modes which offer varying performance and tradeoffs. It appears that the ZWO camera only has one which most resembles the Photographic Mode.
3) The QHY has an M54 interface, the ZWO has M42 interface. This may not matter to some, but it may have ramifications for those who use fast setups such as Hyperstar or RASA, where the steep light cone can cause extra vignetting.
4) Physically, the ZWO body is much shorter at 97mm compared to the 180mm of the early bird and an unknown, but certainly longer than 97mm, length of the standard QHY268C.
CONCLUSION
I think it’s safe to say the CCD era is just about over. As far as color cameras go, this is it. Gone are the old problems of CMOS like amp glow and low native 12 and 14 bit ADCs. The lower read noise and dark current of the QHY268C allows for much shorter exposures, offering much more sensitivity and flexibility. In my opinion this color camera rivals the performance of some of the monochrome sensors in terms of resolution and how clean the images are. If an APS-C sensor like this is offered in monochrome in the same price range, it is pretty much over for CCDs in amateur astronomy. Read Jarrett's complete review and update at:
http://cosmic-colors.com/gear-reviews/qhy268c-review/